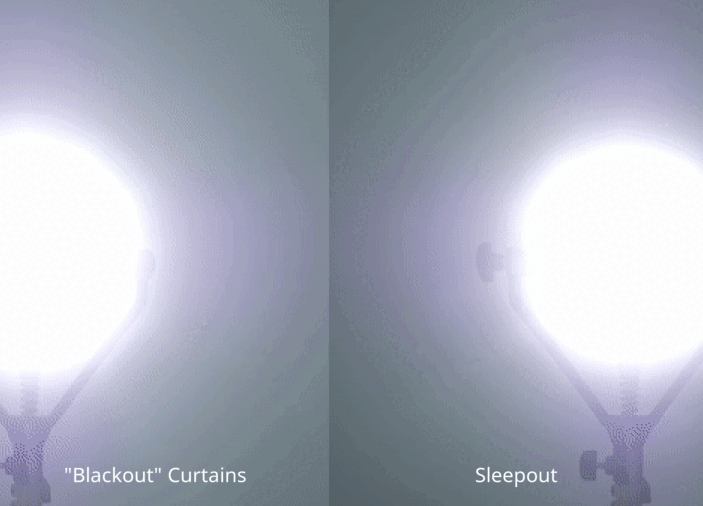
Installing curtain rods might seem daunting, but with the right tools and instructions, you can hang your curtains like a pro, transforming your room’s aesthetics and mood. Whether you’re thinking about upgrading to Sleepout Home Blackout Curtains for better sleep or just want to freshen up a room, this step-by-step guide will ensure a flawless installation.
What You'll Need
- Measuring tape
- Level
- Screwdriver or drill
- Curtain rods
- Wall anchors and screws (usually included with the rod)
- Stud finder (optional)
- Ladder or step stool
- Pencil
Step 1: Measure Your Window
Before purchasing your curtain rods, measure the width of your windows. It’s recommended to extend the curtain rod at least 3-6 inches beyond the frame on each side. This extension makes your windows appear larger and ensures less light peeks through the sides of the curtains.

Step 2: Decide on the Height
To give the illusion of taller windows, mount the rod 4-6 inches above the window frame. If you’re installing blackout curtains, consider placing the rod closer to the ceiling to maximize light blockage and enhance insulation.
Step 3: Check for Studs
Use a stud finder to locate any studs above your window. If available, it's best to mount the brackets into studs. If no studs are found, you will need to use wall anchors to provide sufficient support for your curtain rods.
Step 4: Mark the Bracket Positions
Using your measurements and level, mark where you will place the brackets. Ensure these marks are symmetrical and level across the window. This is key to ensuring your curtain rod hangs evenly.
Step 5: Install the Brackets
Pre-drill holes where you've marked for the brackets, insert the wall anchors if applicable, and screw the brackets into the wall. Double-check that each bracket is secured tightly and sits level.
Step 6: Hang the Rod and Curtains
Once the brackets are up, place your curtain rod on them. Arrange your curtains or drapes as desired and ensure they move smoothly. Make any necessary adjustments to the placements of the curtains before finalizing them.
Step 7: Finishing Touches
Step back and examine the curtains from different angles in the room. Confirm the curtains hang evenly and make minor adjustments if needed. Once everything looks perfect, you can add decorative finials to the rod ends (if your rod comes with them), adding a stylish accent to your room’s decor.

Enjoy Your New Space
With your new curtains up, your space will not only look more appealing but also provide the functional benefits of privacy and light control. Blackout curtains, such as the Sleepout Home Blackout Curtains, are excellent for enhancing sleep quality by blocking intrusive light and noise, making them a great investment for any bedroom.

Hanging curtain rods and curtains doesn’t have to be complicated. With these simple steps, you’ve learned how to do it efficiently, ensuring beautiful results that are both practical and transformative for your living space.