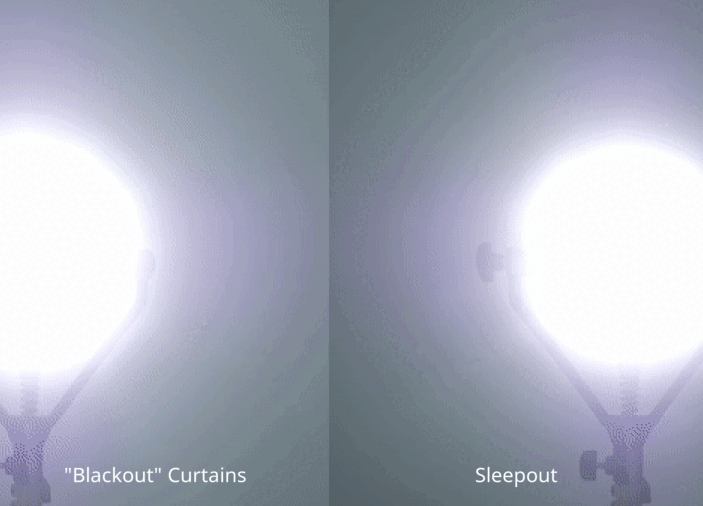
Blackout curtains are a fantastic way to enhance sleep quality, block out external light, and even help with energy saving by insulating your rooms. Whether you're a first-time installer or just needing a refresher, our step-by-step guide will help you install your blackout curtains easily and correctly in no time. Today, we will primarily focus on the Sleepout Home Blackout Curtains, renowned for their effectiveness and ease of installation.
What You'll Need
- Measuring tape
- Pencil
- Curtain rods
- Drill or screwdriver
- Wall anchors and screws (if necessary)
- Level (optional but recommended)
- Ladder or step stool
- Your Sleepout Home Blackout Curtains
Step 1: Measure Your Window
Start by measuring the width of your window. To ensure maximum light blockage, add 4-6 inches on either side of the window frame. This extra width provides ample coverage, reducing light leakage.
Step 2: Decide on Curtain Rod Placement
Position the curtain rod brackets 4-6 inches above the window frame to allow the curtains to hang freely and cover any light gaps. Use a pencil to mark where your brackets will go. It's helpful to use a level to ensure your markings are even across the window.

Step 3: Install the Curtain Rod
Drill holes where you've marked for the brackets. If you're drilling into drywall, use wall anchors to secure the screws. This will ensure your curtain rods are safely and securely mounted. Attach the brackets with screws and ensure they are tight and secure.
Step 4: Prepare the Blackout Curtains
Take your Sleepout Home Blackout Curtains out of the package and iron or steam them if necessary. This will remove any wrinkles and ensure they hang beautifully. Most blackout curtains will either have grommets, a rod pocket, or hooks, depending on the type you've chosen.
Step 5: Hang Your Curtains
Slide your curtains onto the rod. If your curtains use hooks, attach them into the holes or loops at the back of the curtains before hanging the rod on the brackets. Ensure the curtains are evenly distributed. For grommet curtains, ensure the opening end of the grommets faces outward for easy sliding.

Step 6: Adjust for Optimal Coverage
Arrange the curtains to cover any potential light leaks around the edges. Ensure they comfortably reach the floor or window sill, depending on your preference. For blackout curtains, proper coverage is key to effectively blocking out light.
Final Touches
Step back and look at your curtains from inside the room. Adjust them as needed to ensure they look even and provide ideal coverage. You might need to make minor adjustments to the panel or the rod placement.
Maintaining Your Blackout Curtains
To keep your Sleepout Home Blackout Curtains in top condition, vacuum them regularly with a brush attachment to remove dust. For deeper cleans, follow the washing instructions provided with your curtains. This will help maintain their blackout effectiveness and fabric integrity over time.

By following these simple steps, you can enjoy the benefits of blackout curtains in your home. Improve your sleep quality and comfort by eliminating unwanted light and noise with the right set of curtains — a game-changer for both night and daytime rest!