Are you tired of struggling with unwanted light seeping through your windows despite using blackout curtains? Many people face this problem, but the solution might be simpler than you think. In this comprehensive guide, we'll walk you through the process of installing blackout curtain straps to ensure you achieve the perfect, dark room you've always desired. By the end of this article, you'll be an expert in effectively managing light in your space. Let's get started!

Knowing how to install blackout curtain straps can make a world of difference. These simple yet effective tools help secure your curtains tightly against the wall, eliminating gaps and preventing light from sneaking in. First, let’s discuss why blackout curtain straps are essential.
Why Use Blackout Curtain Straps? Blackout curtain straps not only offer improved light-blocking capabilities, but they also enhance privacy and thermal insulation. By securing the curtains snugly, they minimize drafts and heating losses, making your home more energy-efficient and comfortable. Moreover, blackout curtain straps are particularly useful for parents trying to create a dark sleeping environment for their little ones.
Before you start the installation, it's essential to gather all necessary tools and materials. Here are the primary items you'll need:
- Blackout Curtain Straps
- Screwdriver or Drill
- Level
- Measuring Tape
- Marker or Pencil
Let’s dive into the installation steps:
Step 1: Measure Your Windows. The first step is to measure the width of your windows accurately. Use a measuring tape to determine the length from one end of the curtain rod to the other. This measurement will ensure you place the straps evenly.

Step 2: Position the Straps. Holding the curtain strap, use a level to ensure that it's perfectly straight before marking the spots for the screws. Place the straps at strategic points along the window frame, typically at the middle height of your curtain's edges. Mark these positions with a pencil or marker.
Step 3: Attach the Straps. Using a screwdriver or drill, attach the straps into the marked positions. Ensure that the screws are tight enough to hold the straps securely, but be careful not to over-tighten and damage the wall or strap.
And now for the magic touch:
Step 4: Secure the Curtains. Once the straps are in place, pull your blackout curtains to the sides and secure them tightly with the straps. This step is crucial as it ensures that no light can pass through the edges of the curtains.
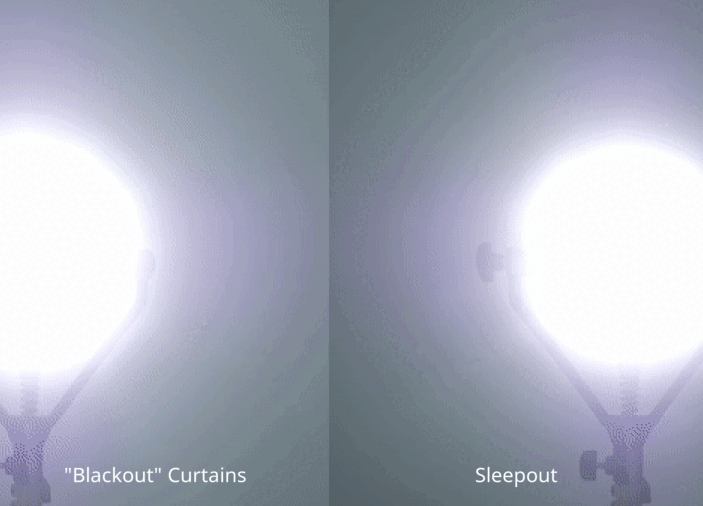
For those looking for optimal blackout solutions, Sleepout Portable Blackout Curtains might be the perfect addition to your setup. They provide 100% blackout and are easy to install, ideal for both home use and travel.
Step 5: Test for Gaps. After securing the curtains with the straps, turn off all lights in the room during the day and check for any light sneaking in. If you notice any gaps, adjust the straps as needed. This step ensures the highest level of light blockage.

Maintenance Tips. Over time, curtain straps can loosen. Regularly check the straps for signs of wear or slack and tighten them as necessary. This upkeep will ensure long-lasting effectiveness.
And remember, organization is key:
Step 6: Keep Everything Neat. Properly arrange the secured curtains to ensure they hang correctly without wrinkles or folds. This step not only improves the aesthetic of your room but also maximizes the effectiveness of your blackout curtains.
For larger or double windows, consider using additional straps to ensure full coverage. Placing straps at both upper and lower points of the curtains can further enhance the blackout effect.
Looking to extend the life of your blackout curtain setup? Extra Sleepout Suction Cups can provide additional support and ensure a prolonged blackout experience.

If you're installing blackout curtains in a child's room, make sure the straps are securely out of reach to prevent potential hazards. Child safety is paramount, so double-check all installations.
User Testimonials. Many satisfied customers have praised the efficiency of blackout curtain straps. One customer mentioned, "I never realized how much light was seeping through until I used the straps. Now, my room is perfectly dark, and I'm sleeping better than ever!" Positive experiences like these highlight the importance of a well-installed blackout setup.
For those with rented properties, remember to check your lease agreement for any restrictions on wall modifications. Adhesive-backed options might be preferable in such cases.

If adhesive options are needed, Sleepout Adhesive Strips could be the answer. They offer damage-free securing solutions. You can check them out here: Sleepout Adhesive Strips.
Environmental Light Considerations. Take note of the external light sources, such as street lamps or car headlights, when positioning your blackout curtains. Adjust the placement of your straps accordingly for maximum effectiveness.
Lastly, innovative solutions such as layering curtains can provide an additional barrier against light. This can be particularly useful for extremely bright environments.
Key Takeaways. Using blackout curtain straps can significantly improve light blockage, enhance privacy, and increase the energy efficiency of your home. By following our comprehensive guide, you can ensure a flawless installation and enjoy the benefits of a perfectly dark room.
We hope this guide helps you achieve the desired results in your home. Remember, the right tools and proper installation techniques can make a world of difference. Happy installing!