Customizing your living space to match your unique style is essential, and sometimes that means altering your curtains to achieve the perfect look and fit. Hemming your curtains can seem daunting if you've never picked up a needle and thread, but with this step-by-step guide, you can become a curtain hemming pro in no time. Whether you've purchased a new set of Sleepout Home Blackout Curtains or you're updating existing ones, here's how you can tailor them to your precise needs.
What You'll Need
- Fabric scissors
- Measuring tape
- Straight pins
- Iron and ironing board
- Sewing machine or needle and thread
- White fabric chalk or pencil
Step 1: Measure Your Window and Curtains
Before you begin hemming, you need to measure the height of your window from where the curtain rod is mounted to where you want your curtains to fall. Many prefer curtains to "kiss" the floor, but you may want them shorter or longer depending on your style. Once you have the window measurements, lay out your curtains on a flat surface and measure their current length. Subtract the desired curtain length from the current length to determine how much fabric you need to remove.

Step 2: Mark and Pin Your Curtains
Turn your curtains face down on a flat surface. Using your measurements, mark where the new hem will be with your fabric chalk or pencil. From this line, measure an additional 2 inches downward; this is where you will cut the fabric. The extra fabric will be folded over to create a clean hem. Use straight pins to pin the fabric in place along your marked line.
Step 3: Cut the Excess Fabric
Using your fabric scissors, carefully cut the excess fabric below the additional 2-inch mark you've made. Make sure to cut as straight as possible to avoid uneven hems.
Step 4: Iron and Pin the Hem
Iron the bottom 2 inches of your curtain where the new hem will be. This creates a sharp fold which is essential for a crisp, professional look. Fold it up once by 1 inch and iron the fold, then fold it again by 1 inch and iron. This double fold not only hides the raw edge but also adds weight to the bottom of the curtains, helping them hang more beautifully.
Step 5: Sew the Hem
If you're using a sewing machine, set it to a straight stitch and sew as close to the top of the fold as possible. If you're hand-sewing, use a needle and thread matching your curtain's fabric, and sew a neat straight stitch. Remove the pins as you sew. Be sure to backstitch at the beginning and end of your hem to secure the thread.

Step 6: Final Iron and Hang
Give your newly hemmed curtain another good iron for a crisp finish. Hang your curtains back up and admire your handiwork! This simple DIY can transform not just your windows, but the ambiance of your entire room.
Conclusion
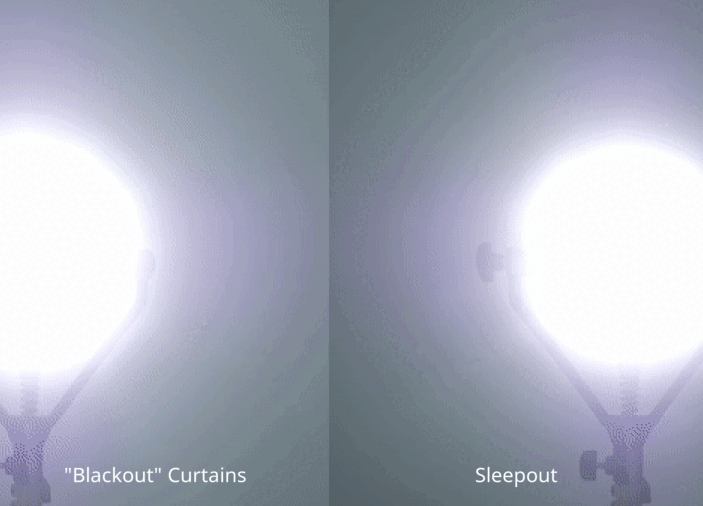
Hemming blackout curtains not only ensures that they perfectly fit your windows but also enhances the room-darkening qualities by eliminating excess light leaks at the edges. With these steps, you can customize not just Sleepout curtains but any others you may choose in the future. It's a handy skill that will keep your home looking tailored and polished.